Please click the thumbnails for full size drawings and complete operating
procedures.
 |
Scheme A: To prevent
the paralleling of two independent sources.
|
|
 |
Scheme A1: To
prevent the paralleling of any of the sources.
|
|
 |
Scheme B: To
prevent the opening of the non-load break disconnect switch while the breaker
is closed.
|
|
 |
Scheme B1: To
prevent the opening of the non-load break disconnect switch while the breaker
is closed; insuring the disconnect switch is locked open before the breaker
can be re-closed for testing or servicing.
|
|
 |
Scheme C: To
prevent the opening of the non-load break disconnect switch while the breaker
is closed; insuring the disconnect switch is locked open by the removal of
and evidence/hold-off/ breaker test key.
|
|
 |
Scheme D: To
prevent the opening of the non-load break disconnect switches while the
breaker is closed; insuring the disconnect switches are locked open and the
breaker isolated by the removal of and evidence/hold-off key, or using the
evidence/hold-off key for testing/servicing of the breaker.
|
|
 |
Scheme E: To
prevent the opening of the non-load break disconnect switches while the
breaker is closed; insuring the disconnect switches are locked open and the
breaker isolated by the removal of and evidence/hold-off key, or using the
evidence/hold-off key for testing/servicing of the breaker. Requiring an
initiation key to release the breaker for operation and begin the switching
scheme.
|
|
 |
Scheme F: To
prevent access to the disconnect switch enclosures while the breaker is
closed.
|
|
 |
Scheme G: To
prevent the operation of the non-load break disconnect switch while the
breaker is closed. Insuring the fuse compartment is isolated before it can be
accessed.
|
|
 |
Scheme H:
Preventing the paralleling of two independent sources through the tie breaker
while allowing the switching of sources to the load(s).
|
|
 |
Scheme H1:
Preventing the paralleling of two independent sources through the tie breaker
while allowing the switching of sources to the load(s).
|
|
 |
Scheme H2:
Preventing the paralleling of any of the sources while allowing the switching
of the loads to alternate sources.
|
|
 |
Scheme K: To
prevent the operation of the non-load break disconnect switch while the
breaker is closed and preventing access to the breaker enclosure with the
switches closed.
|
|
 |
Scheme L: To prevent the paralleling
of lines #1 and #2; performing the operation of switches #1 and #2 under no-load conditions.
|
|
 |
Scheme M: To prevent the operation
of switch #1 with breaker #1,2,3,4 closed.
|
|
 |
Scheme N: To prevent the paralleling
of lines #1 and #2; performing the operation of switches #1 and #2 under no-load conditions.
|
|
 |
Scheme O:
Preventing the paralleling of any of the lines while allowing the switching
of the loads to alternate sources.
|
|
 |
Scheme P:
Preventing the paralleling of any of the lines while allowing the switching
of the loads to alternate sources.
|
|
 |
Scheme R: To prevent the paralleling
of lines #1,2,3 through a common tie bus.
|
|
 |
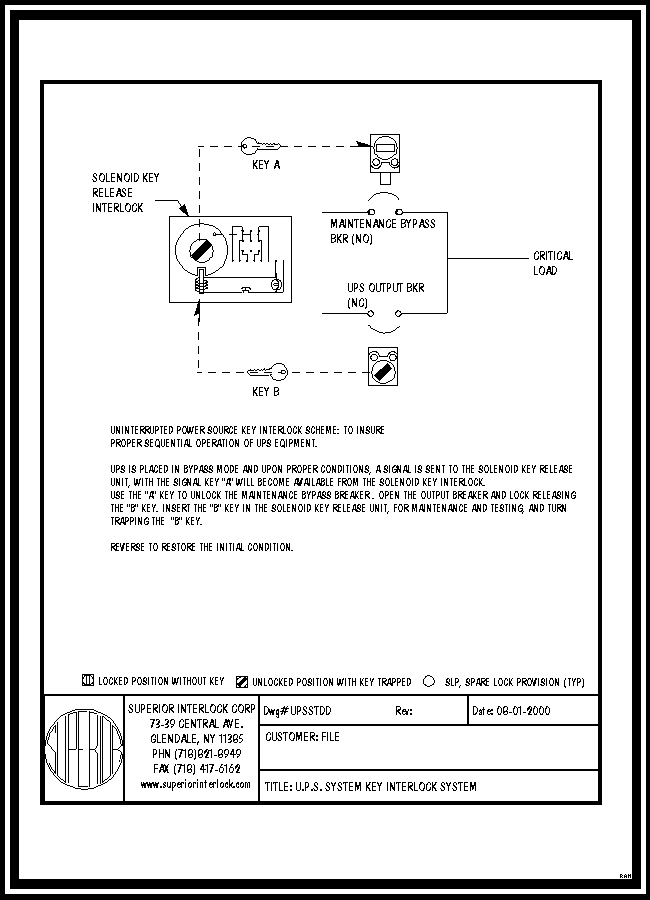
U.P.S schemes 1 & 2:
To insure the proper sequential operation of UPS related equipment.
Printable Specs No. 1
Printable Specs No. 2
|
|
 |
Capacitor Bank Access
Scheme: To prevent closure of the ground switch under load and
ultimately gain access to the capacitor bank area after the capacitor bank has
been grounded and fully discharged.
|
